VAST Integrations
Adomni uses the VAST specification for third-party media players to fetch ad content to play on their devices. VAST is used to serve both images and videos.
See below for a walkthrough of the VAST integration process or try it out with our VAST simulator.
The VAST lifecycle
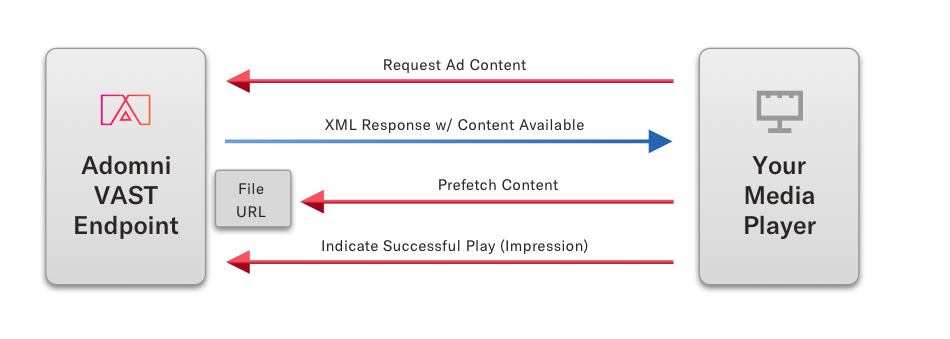
VAST: Step By Step
The following example uses VAST v2.0. Adomni also offers a VAST v3.0 endpoint which follows the same approach but different XML element names in a few cases.
1. VAST RequestMake a HTTP request to Adomni's VAST endpoint for each device using its device key:
GET https://neon.adomni.com/v0/integration/vast/v2_0/device/{DEVICE-KEY}
Note: When your device's schedule is full, you can make a VAST call with the URL param: ?notifyOnly=true, which returns an empty <VAST> element. We log these requests and it helps with monitoring and troubleshooting.
Parse the XML response and use the <Creatives> element to see what ad content there is to play. If there’s no content to play, you’ll get an empty <VAST> element.
At this point, you may also wish to validate media width/height, type, and duration.
3. Prefetch Content Prefetch the creative(s) you expect to play (see: <MediaFile> element). Or, see below for an alternative approach.
Play the ad content in your media player.
5. Indicate a successful play (or error) After playing the content, make a GET request to Impression URL provided in the <Impression> element. Or, if there is a problem with the creative (such as it’s not a supported type), call the error URL found in <Error>.
Note: Before calling the error URL, replace [ERRORCODE] in the querystring with a value taken from the list of valid error codes.
Using your own device identifier (Integration Key)
Some developers prefer using their own internal identifier when making VAST requests, instead of Adomni's device key. This avoids the need to keep track of the Adomni device key on your side. We accomplish this by associating your internal identifier to the device in our system, in a field called "Integration Key".
GET https://neon.adomni.com/v0/integration/vast/v2_0/owner/{OWNER-KEY}?integrationKeys={INTEGRATION-KEY}
The above call results in the same output as a normal VAST request using the device key.
If you'd like to take this approach, contact your Adomni representative and we'll provide you with your owner key and work with you to get the internal IDs mapped on our side.
Bulk Prefetching Content (Optional)
For slow internet connections, it can be useful to prefetch content before the VAST request so you have ample time to download large files such as videos.
To accomplish this, you can call a special prefetch URL which returns all content expected to play in the next ~24hrs:
GET https://neon.adomni.com/v0/integration/vast/v2_0/device/{DEVICE-KEY}/prefetch
This endpoint returns a JSON document containing an array of file URLs:
E.g. ["http://example.com/file1.jpg", "http://example.com/file2.png"]
Note that there is no guarantee that there won't be additional content that shows up in a subsequent VAST request since content can be added at any point. So you'll still want to handle checking for new content returned in the VAST response.
If you are using an Integration Key for your identifier, you can call the prefetch URL like so:
GET https://neon.adomni.com/v0/integration/vast/v2_0/owner/{OWNER-KEY}/prefetch?integrationKeys={INTEGRATION-KEY}
Support for Delayed or Batched Play Confirmations
When possible, it's a good idea to account for intermittent internet connections or system outages.
In this situation, play confirmations (calls to the <Impression> URL) should be queued and retried at a later time.
In order to support this, the <Impression> URL should be appended with the parameter: t=[timestamp], where the [timestamp] is a timestamp in epoch milliseconds (e.g. t=1546273150000) representing when the play in question ended.
The t=[timestamp] is important for two reasons: 1) accurate play reporting, and 2) without the t=[timestamp] param, calls to the impression URL made in rapid succession are ignored to prevent abuse/misreporting.
Misc Notes
- The
<Impression>URL expires 4hrs after showing up in a VAST response. After 4hrs, the URL will still work but will not be counted as a play in Adomni's system. - In our VAST implementation, there will only be a single
<Creative>element in<Creatives>. - Also, there will only be a single
<MediaFile>element in<MediaFiles>. - If your XML parser prefers CDATA encoding for URLs, you can add the param
variant=cdatato the VAST request URL. - Devices mounted on vehicles should add the location (lat/lng) of the vehicle to the VAST request parameters:
lat=[LATITUDE]&lng=[LONGITUDE]. This will be used to determine if the vehicle is within any advertiser-defined campaign geofences. - Devices mounted on vehicles should also add the location (lat/lng) of the vehicle to the impression URL parameters:
lat=[LATITUDE]&lng=[LONGITUDE]. Ideally this lat/lng represents the position at the end of play.
Developer Checklist
Checklist of decisions to make before a VAST integration:
- Select the device identifier to use with the VAST URL: either Adomni’s device ID or your own internal ID (aka "Integration Key").
- Decide whether to prefetch content and at what frequency. Once per hour is common.
- Decide how far in advance of each ad play to make the VAST request. Less than 60 seconds prior to ad play is common.
- Decide if/how to queue and retry play confirmations that may fail due to internet outages or system outages.
Checklist of common dev tasks:
- Store/associate Adomni’s device ID with each player. Or otherwise use your own identifier by storing it in Adomni’s system as the “Integration Key”.
- Periodically call the prefetch URL and cache content.
- Call the VAST Request URL with the device identifier and parse the XML response.
- Render images/video to the screen or skip if no ad content to play.
- Confirm a successful play by calling the URL in the
<Impression>element, or indicate an error by calling the<Error>URL, substituting the appropriate[ERRORCODE]. - Queue/retry play confirmations that fail and add the
t=[timestamp]param to the Impression URL.